InDesign styles: the basics
Styles are predetermined formats for text and objects. Using styles is the fast and efficient way to manage formatting. This article gives an overview of how they work.
Note: the screen shots are from an older version of InDesign. The appearance is a little different, but the function of styles remains exactly the same.
Types of Styles in InDesign
- Character styles – character attributes such as font, strokes and fills, leading, and kerning
- Paragraph styles – controls character attributes and paragraph attributes, such as tabs, indents and spacing, paragraph rules, and hyphenation
- Object styles – object attributes such as strokes and fills, text wraps, and effects; can also contain paragraph styles for text frames
- Cell styles – table cell attributes such as text, and strokes and fills
- Table styles – table attributes such as cell styles, spacing, and strokes and fills
Setting Up Paragraph Styles
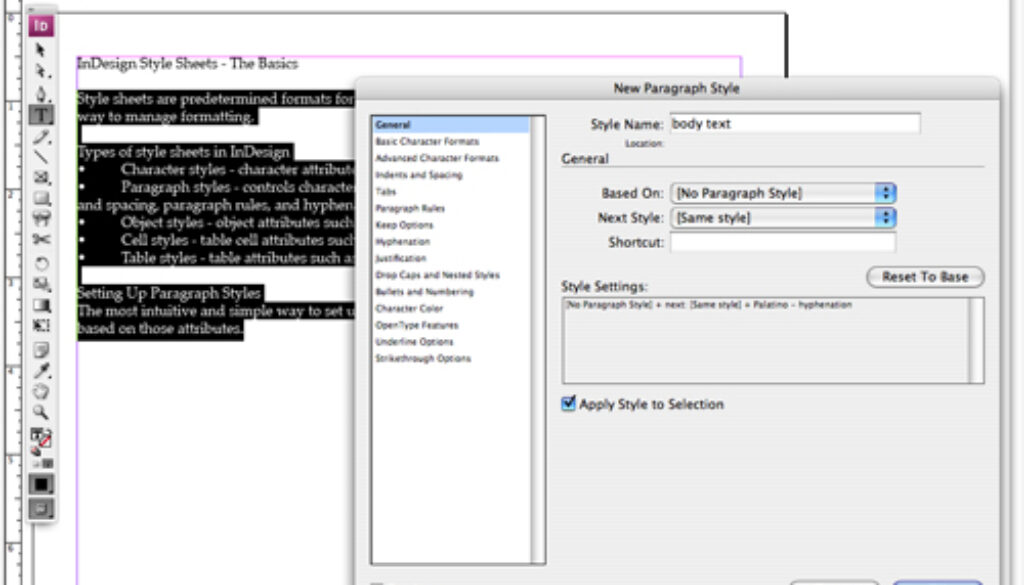
 The most intuitive and simple way to set up styles is to format some text, and then create a new style based on those attributes. First, some simple body text – I selected the text and set the font to Palatino, 12 pt. size, and the hyphenation is turned off. I go to the Paragraph Styles panel and select “New Paragraph Style…” from the drop-down menu.
I’m going to call this style “body text” and click the “Apply Style to Selection” box, then click OK. Now all the selected text is set to the “body text” style, and the style shows up in the Paragraph Styles panel.
I want to fix the bulleted text, so I’ll select that part and adjust the tabs (either by using the Tabs dialog box, which can be accessed by going to Type – Tabs, or through the Paragraph panel).
 After changing that text, notice that the Paragraph Styles panel shows a little plus sign next to the body text style. It’s telling me that there are overrides, which means the text doesn’t exactly match the style’s settings. If I wished to reset the text to be the same as the style, I could click the second icon at the bottom of the panel (the paragraph symbol with the arrow next to it) or option-click the style name. Instead, I’m going to create a new style by again selecting “New Paragraph Style…” from the drop-down menu and call it “bulleted text”.
The first time I created a style, the “Based On:” bar said “[No Paragraph Style]”, but since the body text style was already applied to the selected text, it now says “body text” there. That means that if I edit the body text style, it will automatically change the shared attributes of any style which is based on the body text style, such as the font or font size. Since I want the bulleted text to match the body text, that’s a handy feature.
Next, I’m going to create a heading style. I’ll select the heading text in my document and change the font to Arial Bold, the color to blue, and I’ll add some space before and after (in the Control panel). Then I’ll create a style – as before – by going to the Paragraph Styles panel and selecting “New Paragraph Style…” from the drop-down menu. This time, name it “header 1”, and I will reset the “Based On:” menu back to “[No Paragraph Style]”, because I do not want the headings to change with any edits I may make to the body text.
To assign that same header style to another heading, I just click anywhere on that text and click on “header 1” in the Paragraph Styles panel. The entire paragraph will change to that style.
Setting Up Character Styles
Character styles work similarly to paragraph styles, except they only apply to character attributes, that is, they only affect individual characters or selected areas of text. They don’t apply paragraph attributes like tabs, indents, or paragraph spacing.
In this text from a fundraising group, they want the names of their events to appear in small caps. I’ve already got the text set in a paragraph style, but I’d like to use a character style for the event names. I’ll select one of the event names, change it to small caps by clicking the small caps icon in the Control panel (this could also be done in the Character panel’s drop-down menu). Then I’ll go to the Character Styles panel and select “New Character Style…” from the drop-down menu and name it “small caps”.
The great thing about this is that if I go back to change something in the paragraph style, such as the font or font size, the character styles set within it will also change, without losing their special attributes (in this case, the small caps). Only the shared attributes (the attributes that both the paragraph style and the character style have) will change.
Nested Styles
Here’s another nice trick with character styles, they can be nested within a paragraph style to work automatically. Working again with the bulleted text that lists the kinds of styles, I’m going to select the first part of one line – the name of the style – and change the font and color, and then create a character style called “bullet leader” from it. In the Paragraph Styles panel, I’m going to double-click the “bulleted text” style (it can also be accessed via the drop-down menu, “Style Options…”). Then I’ll click on “Drop Caps and Nested Styles” in the left-hand menu, and then click the “New Nested Style” button. I’ll click on [none] and select “bullet leader” from the drop-down menu that appears, and then I’ll click on the number 1 and change it to three (the bullet is treated as if it was a word). I could also click on “Word” and select any of those options – sentences, characters, digits, em or en spaces, etc. With the Preview button checked on, I can see exactly how it looks.
And There’s More!
I’ve only scratched the surface here. I highly recommend just going through all the various options in the panels to get an overview of all the features and functions within styles.


